Content Menu
● What Is A K&N Washable Air Filter?
● How A Dirty Washable Air Filter Affects Your Engine
● Why Regular Cleaning Matters
● Tools And Products You Need
● Safety And Preparation Tips
● Step‑By‑Step: How To Clean A K&N Washable Air Filter
>> Step 1: Remove The Washable Air Filter
>> Step 2: Apply Filter Cleaner
>> Step 3: Rinse With Low‑Pressure Water
>> Step 4: Drain And Air‑Dry
>> Step 5: Inspect The Dry Washable Air Filter
>> Step 6: Re‑Oil The K&N Washable Air Filter
>> Step 7: Reinstall The Washable Air Filter
● Common Mistakes To Avoid
● How Often To Clean A K&N Washable Air Filter
● Performance And Fuel Economy Benefits
● Environmental And Cost Advantages
● Practical Tips For Different Driving Conditions
● Troubleshooting After Cleaning
● Conclusion
● FAQ – K&N Washable Air Filter Cleaning
>> 1. How do I know when my K&N Washable Air Filter needs cleaning?
>> 2. Can I use soap or pressure washers on a K&N Washable Air Filter?
>> 3. What happens if I over‑oil my K&N Washable Air Filter?
>> 4. How long can a K&N Washable Air Filter last?
>> 5. Is a K&N Washable Air Filter better than a disposable paper filter?
● Citations:
Keeping a K&N Washable Air Filter clean is essential for stable power, efficient airflow, and long filter life. A properly maintained Washable Air Filter can often last as long as your vehicle, making it a smart upgrade over disposable paper filters.
What Is A K&N Washable Air Filter?
A K&N Washable Air Filter is a reusable, high‑flow air filter made from oiled cotton gauze or synthetic media that is designed to be cleaned and re‑oiled instead of discarded. Unlike standard paper filters, a K&N Washable Air Filter allows more air to reach the engine while still trapping harmful dust and debris in multiple layers of media.
Because it is a Washable Air Filter, you maintain it at regular intervals, usually every few tens of thousands of miles depending on driving conditions. With correct cleaning and re‑oiling, many K&N filters are engineered to perform for the life of the car, reducing both waste and long‑term ownership costs.
How A Dirty Washable Air Filter Affects Your Engine
As you drive, dirt, sand, and road dust build up on the surface of your Washable Air Filter, slowly restricting airflow. When the filter becomes clogged, the engine must work harder to draw in air, which can reduce throttle response and overall performance.
A dirty Washable Air Filter can also affect combustion efficiency, which may lead to poorer fuel economy over time. In severe cases, restricted airflow and poor filtration can increase engine wear, especially if fine particles start bypassing a damaged or improperly serviced filter.
Why Regular Cleaning Matters
Cleaning your K&N Washable Air Filter on time restores its designed airflow and filtration balance. This helps your engine breathe more freely, supporting smooth acceleration and consistent power delivery.
Regular service of the Washable Air Filter also protects sensitive engine components, such as cylinders, piston rings, and sensors, from abrasive dust and contaminants. In the long run, this simple maintenance routine contributes to better reliability and fewer unexpected repair costs.
Tools And Products You Need
To clean a K&N Washable Air Filter correctly, prepare the following items in advance:
- K&N air filter cleaning solution or a dedicated K&N cleaning kit
- K&N air filter oil (for oiled cotton Washable Air Filter types)
- Screwdriver or socket set to open the airbox or intake assembly
- A low‑pressure water source, such as a garden hose
- Clean gloves and a soft brush (optional, for very light agitation)
- A clean, dry work area where the Washable Air Filter can air‑dry completely
Using the correct cleaner and oil is important, because harsh chemicals or the wrong oil can damage the media, affect filtration performance, or void the filter's warranty.
Safety And Preparation Tips
Before you start working on the Washable Air Filter, always make sure the engine is completely cool. Opening a hot airbox or touching components close to the engine can cause burns and may damage plastic parts.
Park the vehicle on a level surface, set the parking brake, and open the hood securely. Keep tools organized so you do not lose any screws, clips, or clamps that secure the Washable Air Filter housing. Avoid smoking or working near open flames while handling oil and cleaners.
Step‑By‑Step: How To Clean A K&N Washable Air Filter
Step 1: Remove The Washable Air Filter
1. Locate the airbox or performance intake system on your vehicle.
2. Loosen any screws, bolts, or clips that hold the lid or cover in place.
3. Gently lift the cover and carefully remove the K&N Washable Air Filter, holding it by the frame or rigid edges.
Note the orientation of the Washable Air Filter so you can reinstall it in exactly the same position later. Lightly tap the filter to remove very loose debris, but do not strike it against hard surfaces, as this can damage the pleats or the supporting mesh.
Step 2: Apply Filter Cleaner
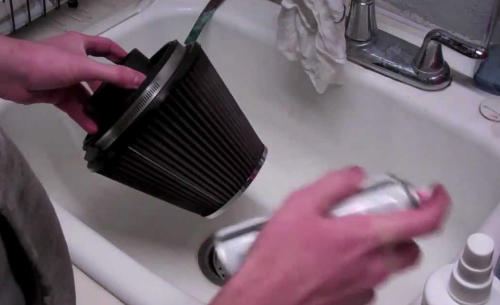
1. Place the Washable Air Filter in a sink, tray, or bucket with the dirty side facing up.
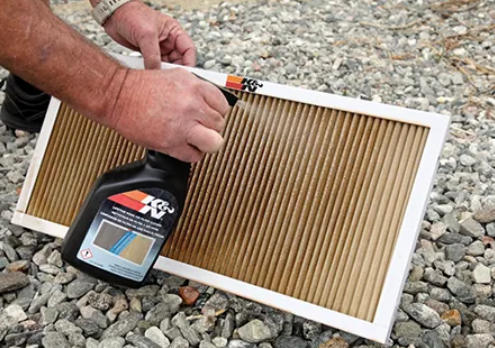
2. Spray the K&N filter cleaner generously onto the dirty side, making sure to cover each pleat.
3. Flip the filter and spray the clean side as well so the solution can penetrate fully.
Allow the cleaner to soak into the Washable Air Filter for several minutes so it can loosen embedded dirt and oil film. Do not let the cleaner dry on the filter, as dried chemicals can be harder to rinse away and may leave residue in the media.
Step 3: Rinse With Low‑Pressure Water
After the soaking period, rinse the Washable Air Filter with cool, low‑pressure water. Always rinse from the clean side toward the dirty side so the water pushes contaminants out of the filter, rather than deeper into the fibers.
Move slowly along each pleat, making sure that all sections are rinsed thoroughly. Continue until the water runs clear and no visible dirt remains. If some areas still look stained, you can repeat the cleaning and rinsing cycle, but stay patient and gentle to avoid tearing the Washable Air Filter material.
Step 4: Drain And Air‑Dry
Once rinsing is complete, gently shake the Washable Air Filter to remove excess water. Avoid twisting, bending, or compressing the pleats, as deformation may affect fit and airflow.
Set the Washable Air Filter in a well‑ventilated area to air‑dry naturally. It is best to place it upright or on a clean, lint‑free surface. Do not use heat guns, hair dryers, ovens, or direct high heat to speed up the process, because excessive heat can shrink or warp the filter media and rubber sealing edges.
Step 5: Inspect The Dry Washable Air Filter
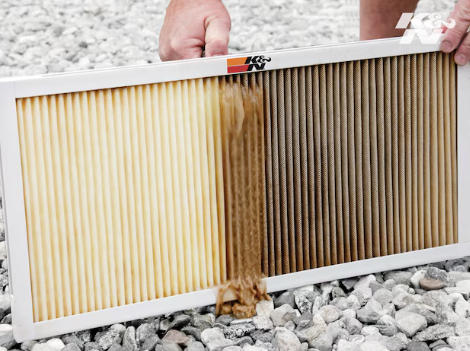
Give the filter enough time to become completely dry all the way through. When it looks dry, inspect it carefully under good lighting. The pleats should appear clean, with no mud, sand, or oily patches remaining.
Check the frame, rubber seal, and mesh for cracks, tears, or separation. If you find serious damage, consider replacing the Washable Air Filter rather than re‑using it, since a compromised filter can allow unfiltered air into the engine.
Step 6: Re‑Oil The K&N Washable Air Filter
If your K&N Washable Air Filter is an oiled cotton type, it must be re‑oiled before reinstallation. Shake the oil bottle or can as directed, then apply oil evenly along the crown of each pleat on the dirty side. Use a smooth, steady motion to avoid heavy spots and gaps.
Allow the oil to wick through the cotton for several minutes. As it spreads, the entire surface of the Washable Air Filter should take on a uniform color. If some pleats still look pale or dry, lightly add more oil to those areas only. The goal is a consistent, thin coating—not thick, dripping oil that can later contaminate sensors.
Step 7: Reinstall The Washable Air Filter
When the oil has fully wicked and there are no wet drips, the Washable Air Filter is ready to go back into the airbox or intake. Clean any dust or debris inside the housing with a cloth so the fresh filter is not immediately exposed to loose dirt.
Reinstall the Washable Air Filter in the same orientation as before, making sure the sealing edge sits flat and fully contacts the housing. Refit the cover, then tighten all screws, clips, or clamps securely. A proper seal around the Washable Air Filter is just as important as the filter media itself, because gaps can allow unfiltered air to bypass the element.
Common Mistakes To Avoid
Many problems with a K&N Washable Air Filter come from a few simple mistakes that are easy to avoid:
- Using strong chemicals, gasoline, or household detergents instead of the recommended cleaner
- Applying high‑pressure water or air that can tear the cotton gauze or deform the pleats
- Re‑installing the Washable Air Filter before it is completely dry inside
- Over‑oiling the filter so that excess oil can be pulled into the intake and onto sensors
- Cleaning the filter too often, which can cause unnecessary wear to the media
By avoiding these habits, you help your Washable Air Filter deliver consistent performance and a long service life.
How Often To Clean A K&N Washable Air Filter
There is no single mileage number that fits every driver, but there are practical guidelines. Under normal highway conditions, many drivers clean a K&N Washable Air Filter roughly every 30,000 to 50,000 miles. In dusty or off‑road environments, the interval may be much shorter.
The most reliable method is visual inspection. Check the Washable Air Filter at each oil change. If you see a uniform layer of dirt covering most of the mesh and pleats, or if the surface looks heavily darkened, it is time for cleaning. If only light dust is present and the mesh is still clearly visible, you may safely wait longer.
Performance And Fuel Economy Benefits
A clean K&N Washable Air Filter maintains high airflow to the engine. Good airflow helps the engine take in the right volume of air for combustion, which can support smooth throttle response and preserve rated power output.
Although a Washable Air Filter on its own is not a magic horsepower upgrade, using it in a clean, well‑maintained intake system can help your engine operate closer to its designed efficiency. Over thousands of miles, this can contribute to stable fuel economy compared with driving on a clogged disposable filter that restricts air.
Environmental And Cost Advantages
Choosing a K&N Washable Air Filter is also a long‑term environmental and financial decision. One reusable filter can replace many single‑use paper filters over the life of a vehicle. This means fewer discarded filters going to landfill and less material consumed in manufacturing replacements.
From a cost perspective, the initial price of a Washable Air Filter is higher than a standard paper filter, but you pay it only once. After a few cleaning cycles, the investment usually pays for itself, especially for drivers who keep vehicles for many years or cover high annual mileage.
Practical Tips For Different Driving Conditions
Your cleaning strategy for a K&N Washable Air Filter should match the way you drive:
- City driving: Frequent short trips may not load the Washable Air Filter with large amounts of dust, so visual checks may show that cleaning intervals can be slightly extended.
- Highway driving: Long distances at speed draw more total air through the filter, so accumulation can be faster; regular inspections are important.
- Off‑road and construction areas: Dirt roads, sand, and heavy dust require much more frequent inspections and cleaning of the Washable Air Filter.
If you often tow, drive in hot climates, or operate in areas with pollen, smoke, or industrial dust, take a more proactive approach and inspect the Washable Air Filter at shorter intervals.
Troubleshooting After Cleaning
Sometimes drivers notice changes after servicing a K&N Washable Air Filter. Here are a few common situations and what they might mean:
- Rough idle or check‑engine light after cleaning: This may indicate over‑oiling, where excess oil reaches a mass airflow sensor. Removing the sensor for careful cleaning (following vehicle‑specific guidelines) and reducing oil on the Washable Air Filter at the next service can help.
- Filter still looks dirty after rinsing: Persistent staining can remain even when the filter is functionally clean. Focus on whether loose debris is gone and water runs clear; dark staining alone does not always mean the Washable Air Filter is still clogged.
- Visible damage to pleats or frame: If you see torn media, collapsed pleats, or cracked rubber, replace the Washable Air Filter. A damaged filter cannot guarantee safe filtration.
By paying attention to these details, you can quickly correct issues and keep your Washable Air Filter working as intended.
Conclusion
Cleaning a K&N Washable Air Filter is a straightforward, repeatable process: remove the filter, apply the correct cleaner, rinse from the clean side out, allow it to air‑dry completely, re‑oil it evenly, and reinstall it with a proper seal. When done carefully, this routine protects your engine, maintains strong airflow, and supports consistent driving performance.
Because a K&N Washable Air Filter is reusable, it saves money over time and helps reduce waste, compared with constantly buying and throwing away paper filters. By understanding the correct steps, avoiding common mistakes, and adjusting your cleaning intervals to your driving conditions, you can enjoy the full benefits of your Washable Air Filter for the life of your vehicle.
FAQ – K&N Washable Air Filter Cleaning
1. How do I know when my K&N Washable Air Filter needs cleaning?
You should clean the Washable Air Filter when you see a uniform layer of dirt covering much of the wire mesh and pleats. Rely on visual inspection at each oil change rather than only on mileage, because driving conditions can vary greatly.
2. Can I use soap or pressure washers on a K&N Washable Air Filter?
It is best not to use generic soaps, harsh detergents, or pressure washers on a K&N Washable Air Filter. Strong chemicals and high pressure can damage the cotton media or loosen the bonding, reducing both filtration quality and filter life.
3. What happens if I over‑oil my K&N Washable Air Filter?
Over‑oiling a Washable Air Filter can cause excess oil to be drawn into the intake system, where it may contaminate sensitive sensors and potentially trigger fault codes or rough running. Always apply a thin, even coat, allow it to wick, and only touch up the remaining light spots.
4. How long can a K&N Washable Air Filter last?
With proper cleaning, drying, and re‑oiling, a K&N Washable Air Filter is designed to last for the useful life of the vehicle. The filter itself does not have a fixed replacement schedule; instead, lifespan depends on correct maintenance and avoidance of physical damage.
5. Is a K&N Washable Air Filter better than a disposable paper filter?
A quality K&N Washable Air Filter typically offers higher airflow than a standard paper filter while still providing strong filtration, especially when maintained correctly. It also reduces long‑term costs and environmental impact by eliminating frequent filter replacements, making it an attractive choice for many drivers.
Citations:
[1](https://www.knfilters.com/cleaning)
[2](https://www.knfilters.com/blog/how-to-clean-your-new-kn-lifetime-washable-home-air-filter/)
[3](https://www.knglobalfiltration.com/how-to-clean-your-industrial-air-filter-2/)
[4](https://www.youtube.com/watch?v=pohkTM6jaDs)
[5](https://www.kemsoracing.com/blogs/news/k-n-air-filter-cleaning-the-complete-guide-for-peak-performance-and-long-filter-life)
[6](https://www.autozone.com/diy/air-intake/how-to-clean-reusable-car-air-filter)
[7](https://www.reddit.com/r/Autos/comments/hawyv/how_to_clean_a_kn_air_filter/)
[8](https://www.youtube.com/watch?v=WX6CedJwGJ0)
[9](https://www.facebook.com/KNFilters/videos/kn-home-air-filter-cleaning-instructions/342073070097967/)
[10](https://www.instagram.com/reel/DCvlAUuSszO/?hl=en)


