Content Menu
● What Is A Washable Air Filter?
● Key Benefits Of A Washable Air Filter
● Safety And Preparation
● Tools And Materials You Will Need
● Step 1: Locate Your Current Filter
● Step 2: Remove The Old Filter Safely
● Step 3: Verify Washable Air Filter Size
● Step 4: Understand Airflow Direction
● Step 5: Insert The Washable Air Filter
● Step 6: Clean The Compartment And Seal The Access
● Step 7: Restore Power And Check Operation
● How To Clean A Washable Air Filter
● Drying And Reinstalling After Cleaning
● Common Mistakes To Avoid
● Washable Air Filters In Different Systems
● How Often To Inspect A Washable Air Filter
● Impact On Energy Efficiency And Comfort
● Choosing The Right Washable Air Filter
● Conclusion
● FAQ
>> (1) How often should a Washable Air Filter be cleaned?
>> (2) Can a Washable Air Filter replace any disposable filter?
>> (3) Is it safe to run the system while the Washable Air Filter is drying?
>> (4) What products should I use to clean a Washable Air Filter?
>> (5) Do Washable Air Filters really save money?
● Citations:
Installing a Washable Air Filter is a simple DIY task that can improve indoor air quality, protect your HVAC equipment, and reduce long‑term filter costs when done correctly. A clear step‑by‑step process helps ensure your Washable Air Filter fits properly, seals well, and delivers reliable performance over many years.
What Is A Washable Air Filter?
A Washable Air Filter is a reusable air filter designed to be removed, cleaned, dried, and reinstalled instead of being thrown away after a single use. It is commonly built from synthetic fibers, aluminum mesh, or electrostatic media that can tolerate repeated washing without losing structural strength.
In a typical HVAC or air‑handling system, the Washable Air Filter sits in the same slot as a disposable filter and captures dust, lint, pet hair, and other airborne particles before air enters the blower and coils. When maintained on a regular schedule, a quality Washable Air Filter can remain in service for several years and significantly cut down replacement waste.
Key Benefits Of A Washable Air Filter
A Washable Air Filter offers several advantages compared with standard disposable filters. Over time, one reusable filter can replace many disposable filters, so the total cost of filtration often drops substantially after the initial purchase. You buy once and then invest mainly in cleaning time instead of constant replacements.
Washable Air Filters are also more environmentally friendly because they reduce the number of paper, fiberglass, and cardboard filters sent to landfills. In addition, a properly cleaned Washable Air Filter supports stable airflow, which helps your HVAC system operate smoothly and can contribute to more consistent temperature control and comfort.
Safety And Preparation
Before working around any blower or ductwork, always turn off the HVAC system at the thermostat and, if available, at the service switch or breaker. This minimizes the risk of the system starting unexpectedly and stops air from pulling dust into your face while the filter is removed.
Wear light gloves and a dust mask if you are sensitive to airborne particles, since the existing filter may be heavily loaded with dust. Keep a flashlight nearby so you can clearly see the filter rails, the slot, and any labels or arrows that indicate airflow direction for the new Washable Air Filter.
Tools And Materials You Will Need
For installing a Washable Air Filter at home, you usually only need simple tools and the correctly sized filter. Gather everything before you begin so you will not need to leave the system open for long.
Commonly required items include:
- The correct size Washable Air Filter (match length, width, and thickness)
- Screwdriver or nut driver for access panels or grilles
- Ladder or step stool for ceiling or high wall returns
- Flashlight to inspect the filter bay clearly
- Soft cloth or a small vacuum to remove dust from the compartment
Step 1: Locate Your Current Filter
The first task is to find where your existing filter sits in the system, because the Washable Air Filter will be installed in exactly the same location. In many homes, the filter is located in a narrow slot next to the furnace or air handler, usually in a basement, garage, closet, or utility room.
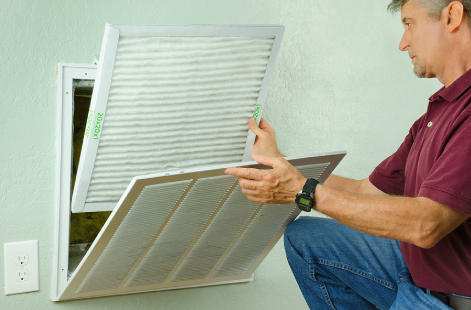
In other layouts, especially in warmer climates, the filter may be behind a large return grille on a hallway ceiling, wall, or in a central living area. Look for a hinged grille or a removable panel; behind it, you will usually see a rectangular filter that you can slide out and replace with your Washable Air Filter.
Step 2: Remove The Old Filter Safely
Once the power is off and you have located the filter, open the access door or return grille slowly and support it so it does not snap down or bend. Slide the old filter straight out, keeping it as level as possible to avoid dropping dust and debris onto the floor or into the equipment.
Check the old filter frame for size markings and for an airflow arrow. This information helps you verify that your new Washable Air Filter has the correct dimensions and will be oriented properly. Place the used disposable filter directly into a trash bag, or move an older washable filter to a cleaning area if you plan to reuse it as a backup.
Step 3: Verify Washable Air Filter Size
Before inserting the Washable Air Filter, confirm that the nominal size on the frame matches the size of the old filter or the size recommended by the equipment label. Common markings look like “16 x 20 x 1” or “20 x 25 x 2,” indicating length, width, and thickness in inches.
A Washable Air Filter that is too small can leave gaps that allow unfiltered air to bypass the media and carry dust straight into the blower and coils. A filter that is too large may not fit or may have to be forced into the slot, which can bend the frame, damage the gasket, and create air leaks. The best performance comes from a Washable Air Filter that slides in smoothly and fills the compartment without extra space.
Step 4: Understand Airflow Direction
The airflow direction is one of the most important details when installing any Washable Air Filter. Most filters have an arrow printed or embossed on the frame that shows which way the air should flow through the media. The arrow must always point toward the blower or air handler, not toward the room.
For filters located at a furnace or air handler, the arrow on the Washable Air Filter usually points into the unit from the return duct. For filters mounted behind return grilles in ceilings or walls, the arrow should point away from the living space and into the ductwork. Installing a Washable Air Filter backward can increase resistance, reduce filtration effectiveness, and sometimes cause strange noise or vibration.
Step 5: Insert The Washable Air Filter
After checking size and airflow orientation, slide the Washable Air Filter into the slot or frame. Keep the filter edges aligned with the rails or guides so the frame does not twist or catch on the metal housing. The Washable Air Filter should move in with gentle pressure, not force.
Once it is fully seated, check all four sides for gaps. If your system has clips, a retaining bar, or a dedicated filter rack, make sure these parts hold the Washable Air Filter firmly in place. When properly installed, the filter should not rattle, bow, or move when you lightly push on it.
Step 6: Clean The Compartment And Seal The Access
With the Washable Air Filter in place, take a minute to clean the surrounding area. Wipe nearby surfaces and ledges with a soft cloth or use a small vacuum nozzle to remove loose dust inside the filter bay and around the door frame. This extra step keeps stray dust from being blown around the system when the blower restarts.
Close the access panel or grille and tighten any screws or latches so the door seals tightly. A well‑sealed compartment forces air to pass through the Washable Air Filter instead of leaking around the edges, which improves both air quality and system efficiency.
Step 7: Restore Power And Check Operation
Turn the HVAC system back on at the switch and thermostat, then run the fan or cooling mode for a few minutes. Listen for any whistling, banging, or rattling that might indicate the Washable Air Filter is loose or that the panel is not fully closed.
Place your hand or a small tissue near a supply register and near the return to confirm that airflow feels normal. If airflow is extremely weak, double‑check that the Washable Air Filter is the correct size, that it is fully dry if previously washed, and that it is not blocked by packing material or a protective film that was never removed.
How To Clean A Washable Air Filter
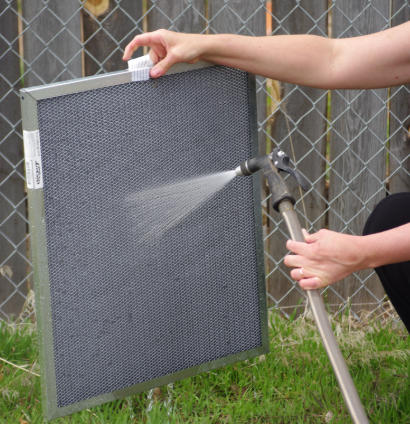
Installation is only the first step; the long‑term success of a Washable Air Filter depends on proper cleaning. Most manufacturers suggest cleaning every one to three months, but you should adjust this interval based on how quickly the filter loads with dust in your environment.
A typical cleaning cycle for a Washable Air Filter looks like this:
1. Turn off the HVAC system and remove the Washable Air Filter.
2. Gently tap the filter or use a vacuum with a soft brush to remove loose dust.
3. Apply a dedicated filter cleaner or mild detergent solution to both sides of the media.
4. Rinse the Washable Air Filter with low‑pressure water, ideally from the clean side toward the dirty side to push particles out.
5. Allow the filter to air‑dry completely on a clean surface before reinstalling it.
Drying And Reinstalling After Cleaning
A Washable Air Filter should never be returned to service while dripping wet, because water can be drawn into the ductwork and may encourage microbial growth or corrosion in some parts of the system. Instead, let the filter drain and dry naturally, preferably in a shaded and well‑ventilated area.
To keep the system protected during the drying period, many homeowners keep a second Washable Air Filter or a basic disposable filter as a temporary backup. When the primary Washable Air Filter is fully dry, you can reinstall it following the same steps used during the initial installation.
Common Mistakes To Avoid
Several common errors can reduce the performance and lifespan of a Washable Air Filter. Knowing these mistakes in advance helps you avoid them:
- Using the wrong size Washable Air Filter or leaving large gaps in the frame
- Installing the filter with the airflow arrow pointing in the wrong direction
- Running the HVAC system without any filter while the Washable Air Filter is drying
- Washing the filter with high‑pressure water, harsh chemicals, or hot air that can damage the media
- Forgetting to clean the filter on schedule, which can clog the media and strain the blower
By preventing these mistakes, your Washable Air Filter is more likely to function reliably and protect your HVAC equipment effectively.
Washable Air Filters In Different Systems
Washable Air Filters are used not only in standard residential furnaces but also in packaged rooftop units, split systems, fan coil units, and some industrial air‑handling systems. In each case, the basic principles remain the same: correct size, correct direction, secure sealing, and consistent cleaning.
In industrial or pharmaceutical environments, Washable Air Filters often act as pre‑filters, capturing larger particles before air passes through tighter downstream filters such as HEPA cartridges or sterilizing filters. This layout extends the life of high‑grade filters and helps keep overall maintenance costs under control, as long as cleaning procedures for the Washable Air Filter follow strict internal standards.
How Often To Inspect A Washable Air Filter
Even if you have a cleaning schedule, it is wise to visually inspect the Washable Air Filter more often, especially during heavy heating or cooling seasons. A quick inspection once a month can reveal heavy dust accumulation, physical damage, or signs that the filter is not seated correctly.
If you notice the surface of the Washable Air Filter turning visibly gray or brown, or if you see clumps of dust on the upstream side, it is usually time to clean it—even if your planned cleaning date is still weeks away. Regular inspections keep surprises to a minimum and help you react before dust affects indoor air quality or system performance.
Impact On Energy Efficiency And Comfort
A clean, properly sized Washable Air Filter supports smoother airflow through your HVAC system. When airflow is stable, the blower motor does not have to work as hard, and the system can reach the set temperature more efficiently. This can contribute to lower utility bills over the lifetime of the equipment.
At the same time, good airflow helps distribute conditioned air evenly across rooms, so you experience fewer hot and cold spots. By combining a well‑installed Washable Air Filter with periodic professional maintenance, you support both efficiency and long‑term comfort in your home or facility.
Choosing The Right Washable Air Filter
Not all Washable Air Filters are built alike. When choosing a product, consider several factors, such as filtration rating, frame construction, gasket quality, and compatibility with your system's airflow and pressure requirements. Select a filter with a rating that fits your air quality needs without exceeding the resistance your system can handle.
In homes where severe allergies or respiratory conditions exist, you may decide to use a Washable Air Filter as a pre‑filter in combination with other specialized filters. Discussing your options with an HVAC professional can help you balance filtration performance, maintenance effort, and equipment limitations while still enjoying the benefits of a reusable filter.
Conclusion
Installing a Washable Air Filter is an effective way to upgrade your air filtration while lowering the long‑term cost and waste associated with disposable filters. By turning off the system, locating the filter compartment, matching the correct size, confirming airflow direction, and seating the Washable Air Filter securely, you can complete the installation in just a short time.
Ongoing success depends on regular inspections and proper cleaning of the Washable Air Filter, including gentle washing, complete drying, and careful reinstallation. Whether your system serves a residential living room or a critical industrial process, a correctly installed and well‑maintained Washable Air Filter helps protect equipment, improve indoor air quality, and support stable, efficient operation.
FAQ
(1) How often should a Washable Air Filter be cleaned?
In most homes, a Washable Air Filter should be cleaned every one to three months, depending on dust levels, pets, local pollution, and how often the system runs. If you notice visible dirt or reduced airflow sooner, clean the filter earlier rather than waiting for a fixed date.
(2) Can a Washable Air Filter replace any disposable filter?
A Washable Air Filter can usually replace a disposable filter if the length, width, and thickness match and the system can handle the airflow resistance of the reusable media. However, if your system depends on a very high‑efficiency disposable filter for medical or allergy needs, you may need to keep that filter or use the Washable Air Filter as a pre‑filter only.
(3) Is it safe to run the system while the Washable Air Filter is drying?
It is not recommended to operate your HVAC system without any filter installed, because unfiltered dust can quickly accumulate on the blower, coils, and ductwork. Instead, keep a second clean filter available or schedule cleaning when you can leave the system off until the Washable Air Filter is completely dry.
(4) What products should I use to clean a Washable Air Filter?
Most manufacturers suggest using a dedicated filter cleaning spray or a mild detergent mixed with water to clean a Washable Air Filter. Avoid harsh solvents, strong acids or alkalis, high‑pressure washers, and very hot air, since these can damage the filter media, frame, or protective coatings over time.
(5) Do Washable Air Filters really save money?
Over the lifetime of the equipment, a good Washable Air Filter can save money by replacing many disposable filters and reducing the frequency of replacements. While the upfront cost is higher, the ability to reuse the filter for several years, combined with lower waste and fewer trips to buy new filters, typically produces a noticeable long‑term cost benefit.
Citations:
[1](https://www.youtube.com/watch?v=JuZu9gE5LoM)
[2](https://www.youtube.com/watch?v=Kd4lNI-oopw)
[3](https://www.homedepot.com/c/ah/how-to-change-a-home-air-filter/9ba683603be9fa5395fab906a15a05f)
[4](https://www.ahs.com/home-matters/repair-maintenance/the-ultimate-guide-to-replacing-hvac-filters-types-timing-and-tips/)
[5](https://basc.pnnl.gov/resource-guides/proper-installation-furnace-and-air-handler-filters)
[6](https://permatron.com/other-filter-installs/how-to-install-your-washable-air-filter)
[7](https://aerovivo.com/pages/installation-tutorial)
[8](https://www.youtube.com/watch?v=sOcfx5o9-B4)


